Spending Policy Distribution User Guide
- 03 Nov 2025
- 6 Minutes to read
- Print
- DarkLight
Spending Policy Distribution User Guide
- Updated on 03 Nov 2025
- 6 Minutes to read
- Print
- DarkLight
Article summary
Did you find this summary helpful?
Thank you for your feedback!
Contents
Navigating to Spending Policy Distributions
Creating a Workflow Template for a Fund Distribution
Editing a Workflow Template for a Fund Distribution
Spending Policy (SP) Distributions Report
Spending Policy Distributions
Funds can be restricted to an annual spendable amount each year via the use of a Spending Policy.
Spending Policies are typically calculated as a percentage of a fund’s average balance over a prior period of time.
Spending Policy (SP) Distributions functionality allows users to designate the payees and allocation amounts for funds that utilize a Spending Policy.
This section is included in a fund’s contact profile, titled “Spending Policy Distributions”, and is only available for funds with active Spending Policies.
Spending Policy Distributions section
Funds eligible for Spending Policy Distributions will have a designated section on the Fund Profile. If no section appears, please reach out to your Client Service Rep for it to be added.

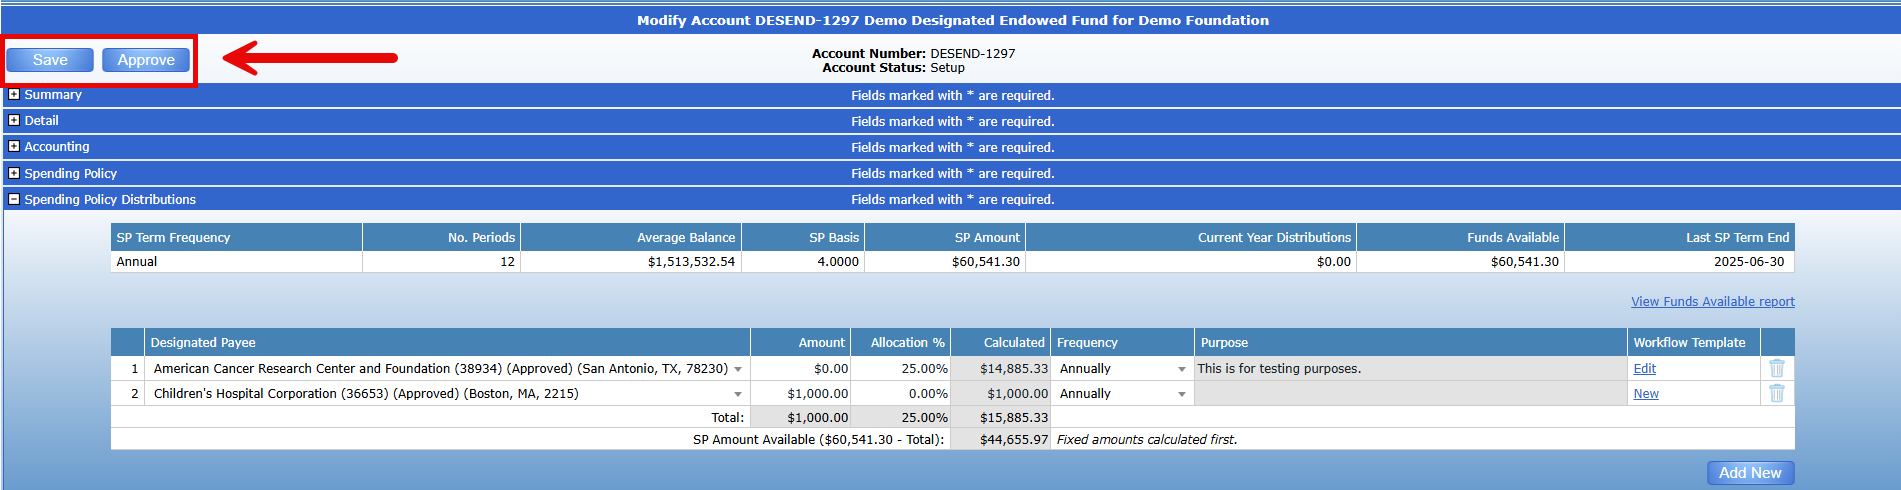
This section displays the following:
Average Balance for the Fund
The average amount of money held in the fund over a set period.
SP Basis (Spending Policy Basis)
The amount used to determine how much can be spent from the fund.
SP Amount (Spending Policy Amount)
The calculated dollar amount that can be spent from the fund this year.
Current Year Distributions
The actual amount of money that has been spent or distributed from the fund during the current fiscal year.
Funds Available
The remaining amount that can still be spent from the fund this year under the spending policy.
Latest SP Term End
The date the previous spending policy ended.
This section allows you to do the following:
Select a Designated Payee
Apply either a specific amount or an allocation percentage for that payee
Determine the frequency of payments
Input the purpose of the payment
Create a Workflow template for the payee’s distribution
Selecting a Designated Payee
To add a designated payee, select “Add New” on the bottom right corner. This will automatically add a field to the form.

Under the Designated Payee, there is a search bar and dropdown menu which will list all Active Payees. Select the desired payee by searching for their name.
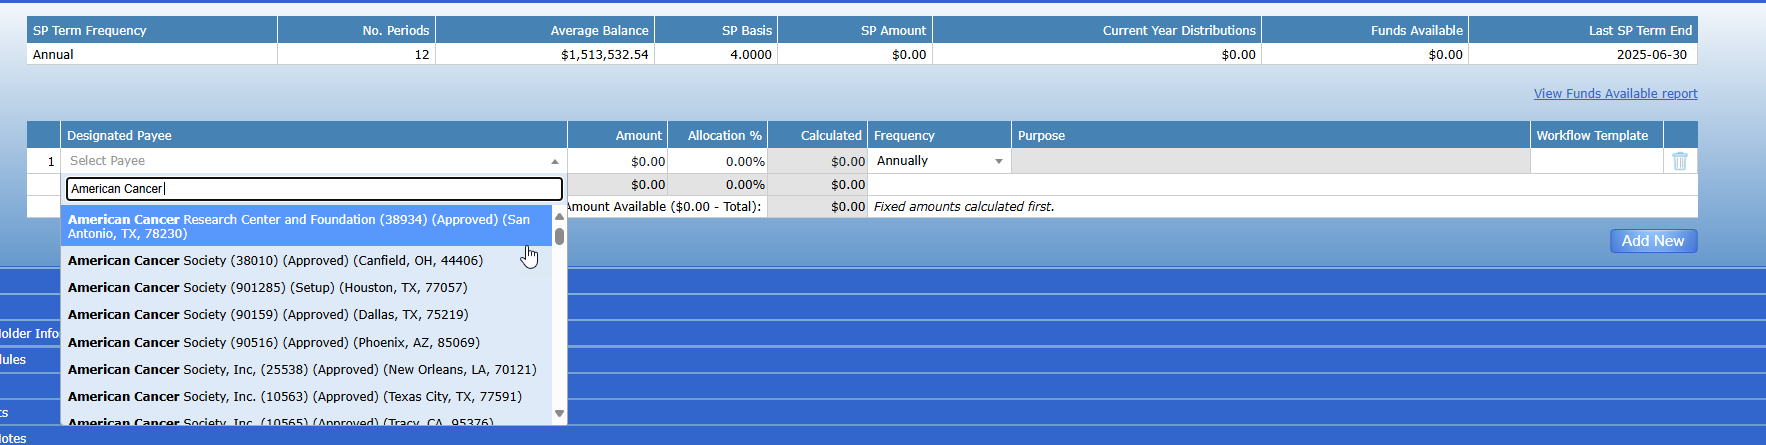
To add an additional payee, click add new at the bottom of the screen and follow the previous steps.

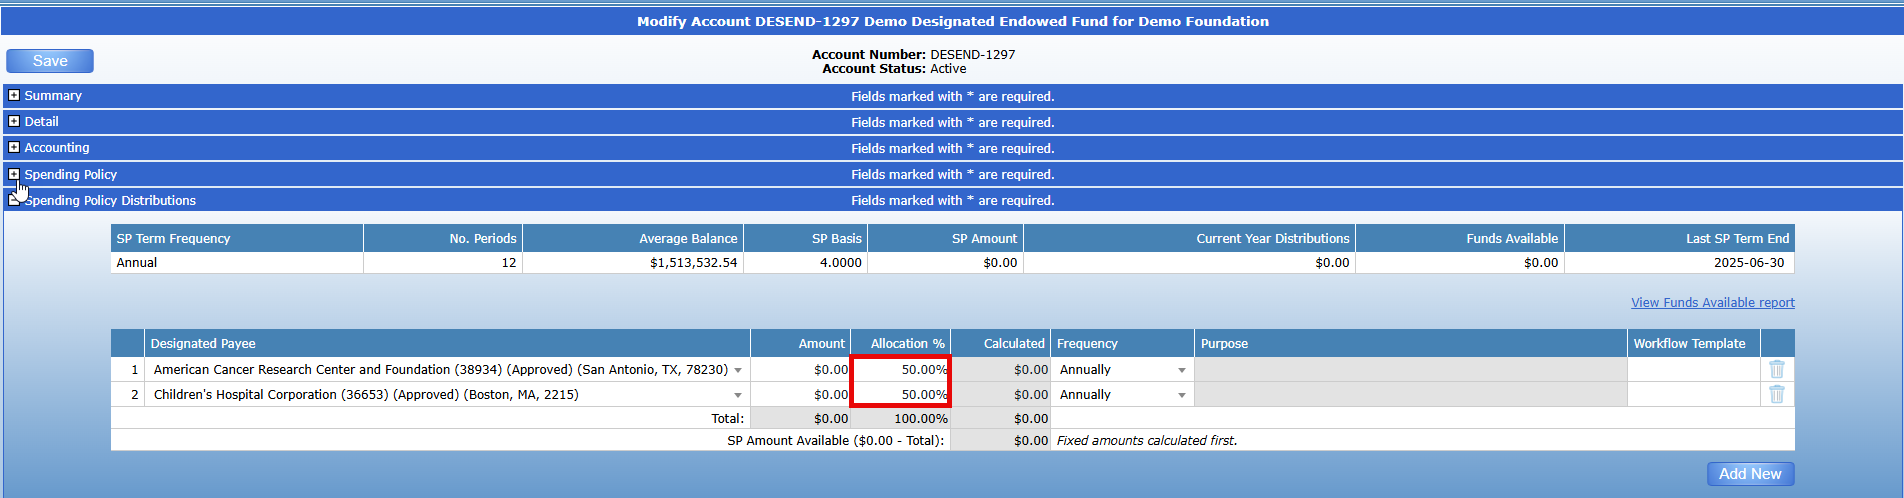
After adding payees, enter in their Distribution Amount or Allocation Percentage.
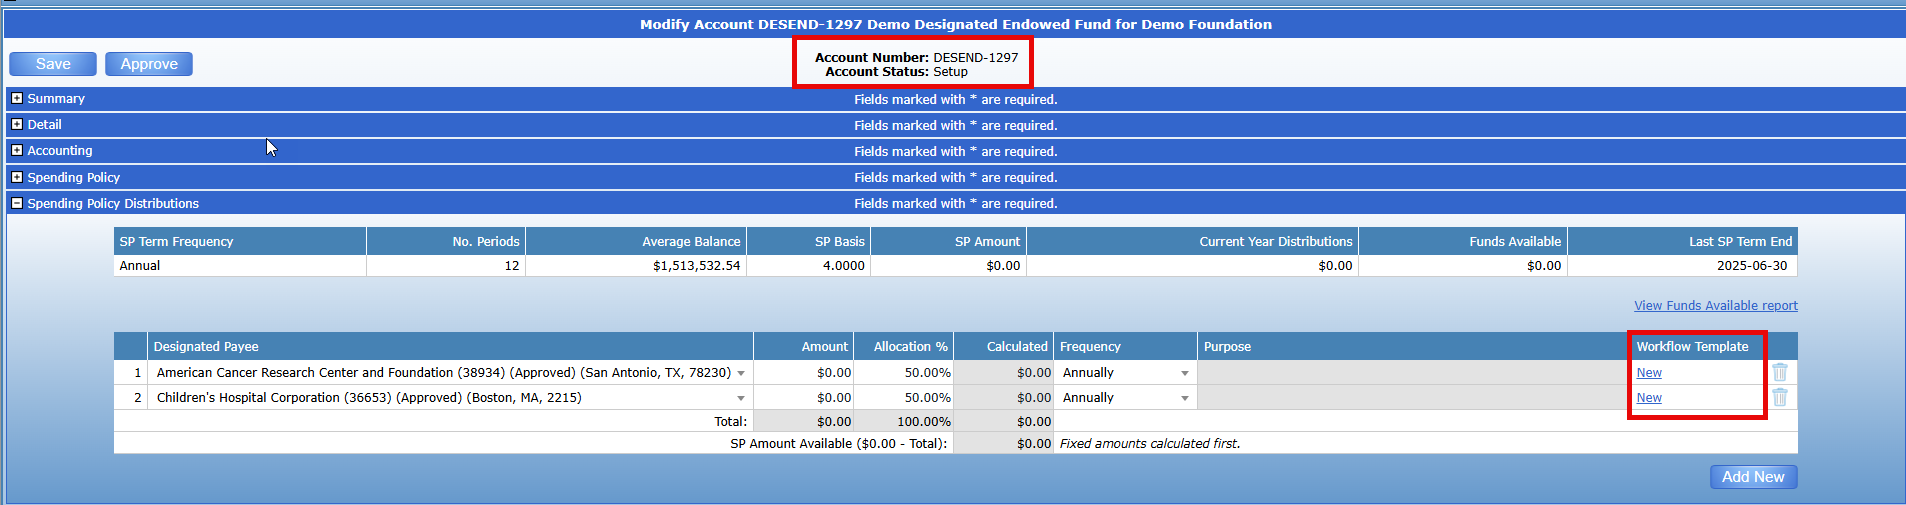
Then click ‘Save’. If no allocation % or amount is entered, the payees will not be saved. After saving, the fund will revert to ‘Setup’ status, and the option will appear to add “Workflow Templates” for the payees. A workflow template is required to be in place in order for a workflow to be generated via the Policy Distributions Report.
A distribution or allocation amount can be changed later if needed. (see below for further information as to how Distribution Amounts are calculated).
To delete a payee, select the ‘Trash’ Icon. Then click ‘Save’ for any changes to take effect.

Setting a Distribution Amount
After adding a designated payee, enter either an amount or allocation percentage.
Any fixed amounts will be deducted from the Funds Available first and then the allocation percentage will be calculated from the remaining balance.
For example, a fund has $2,000 in their Funds Available Balance and two designated payees. One payee is set to receive a fixed amount of $500, and the other is set to receive 25%. The system will automatically deduct the $500 from the $2,000 and then calculate 25% from the remaining balance ($1,500).
The Calculated Amount along with the total will automatically adjust as payees are added or deleted.

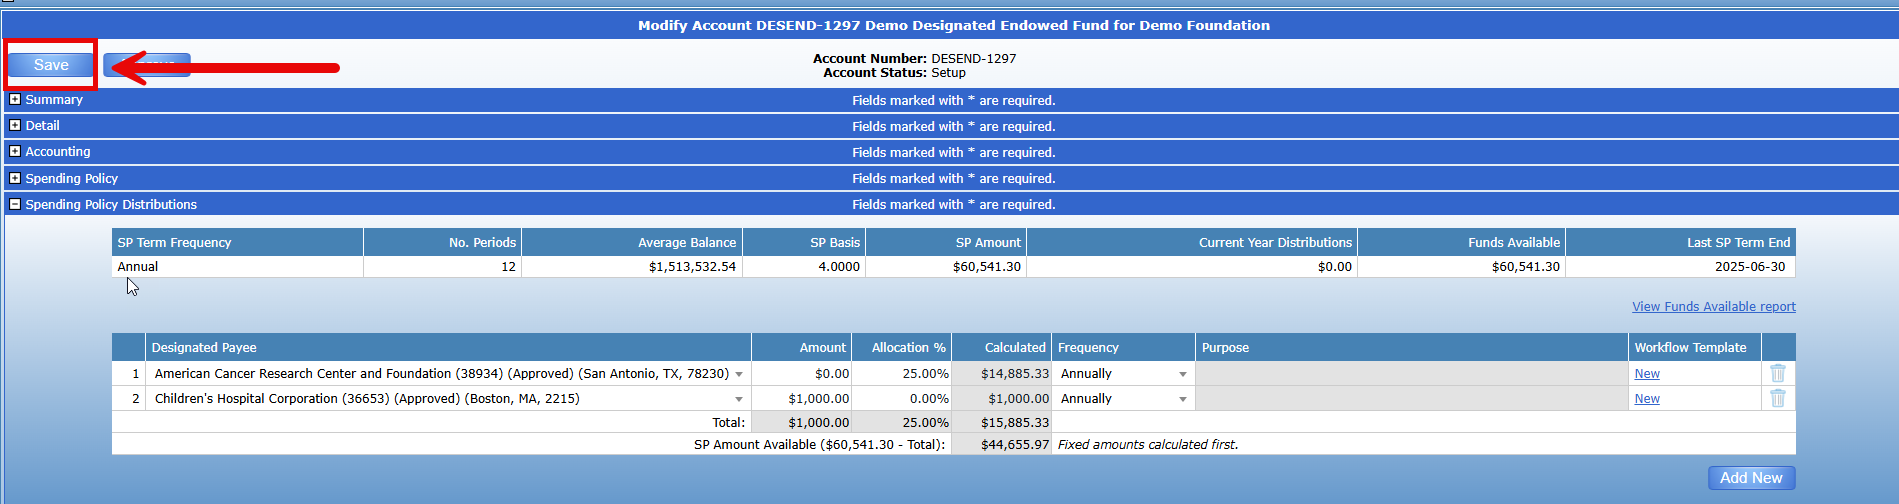
For any changes to take effect, click ‘Save’ at the top. Make sure to complete all changes before submitting for approval.
Creating a Workflow Template for a Fund Distribution
After adding a payee, inputting their distribution, and clicking ‘Save’. The page will refresh and the option to create a Workflow Template will appear.

This workflow template is similar to a standard Disbursement Form and can be saved and edited as needed.
Templates created for SP Distributions can only be edited from the Fund Profile and will not be visible under ‘My Forms’.
Fund and Grantee default values will be pulled automatically when creating the template.
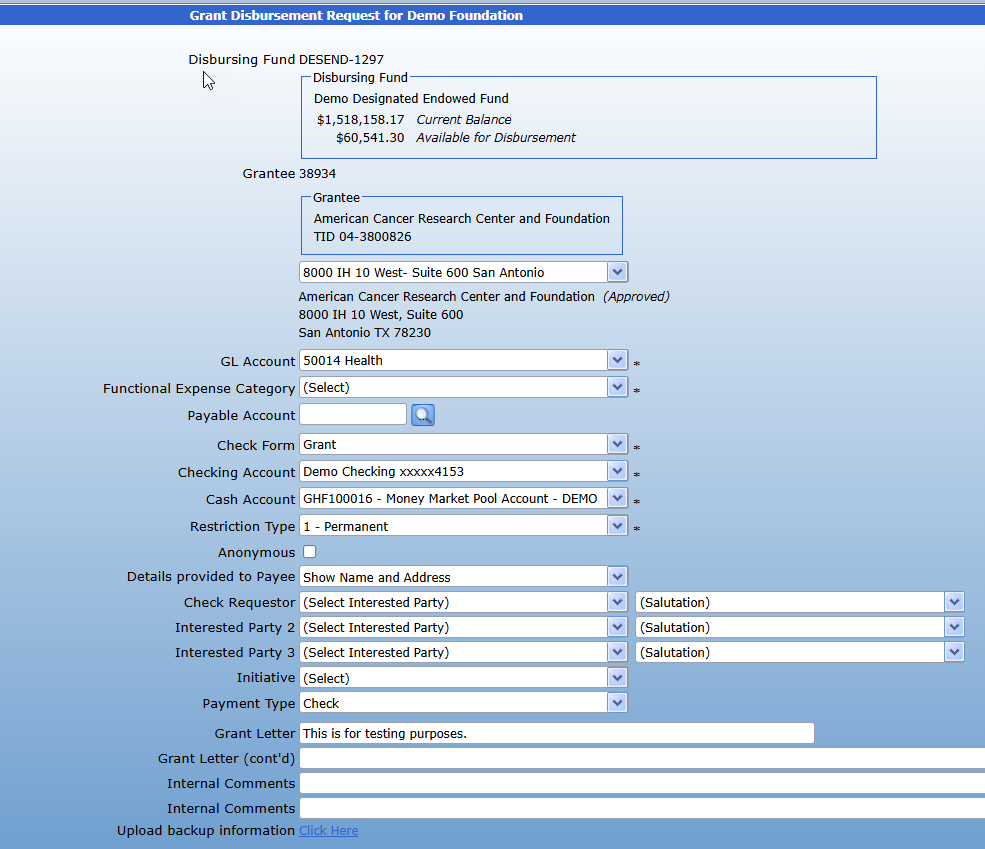
Any text inputted in the ‘Grant Letter’ section of the template will appear as the ‘Purpose’ for the Grant.
After filling out the form, select ‘Save Template’ at the bottom of the screen for the changes to take effect.
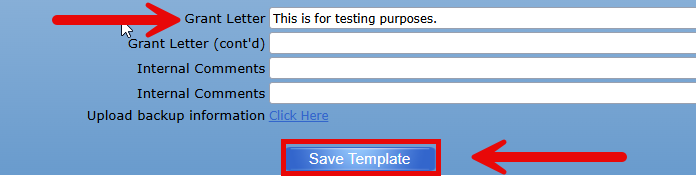

Any changes made to the Spending Policy Distributions must be saved in order to take effect.
After saving, the Fund will be reverted to ‘Setup’ status and will need to be Approved again through your organizations’ standard approval process.
Editing a Workflow Template for a Fund Distribution
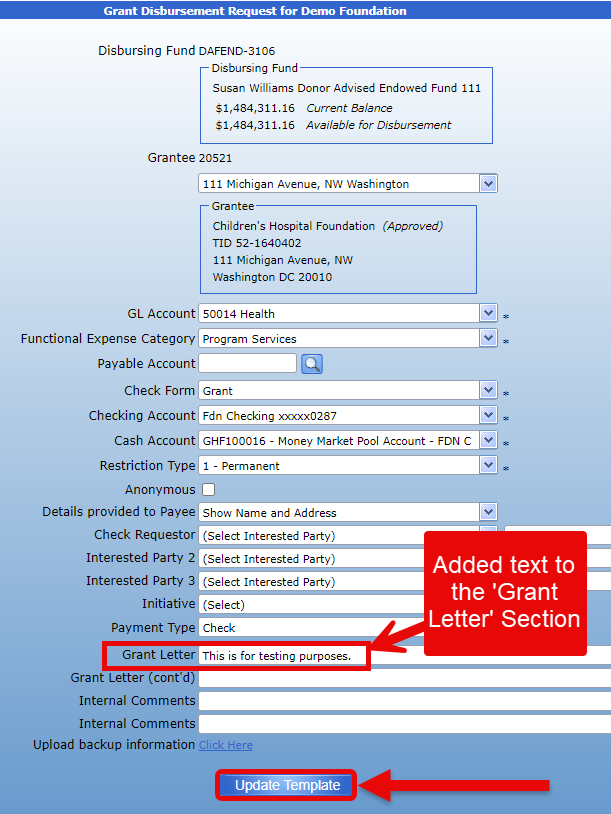
To edit the Workflow template, click the edit button located in the ‘Workflow Template’ Column.

This will open up the Grant Disbursement Template that is attached to the payee.

Input the requisite changes and then select ‘Update Template’ at the bottom of the form.
After updating, select ‘Close’ on the top right corner of the form to return to the Spending Policy Distributions section of the Contact Profile.
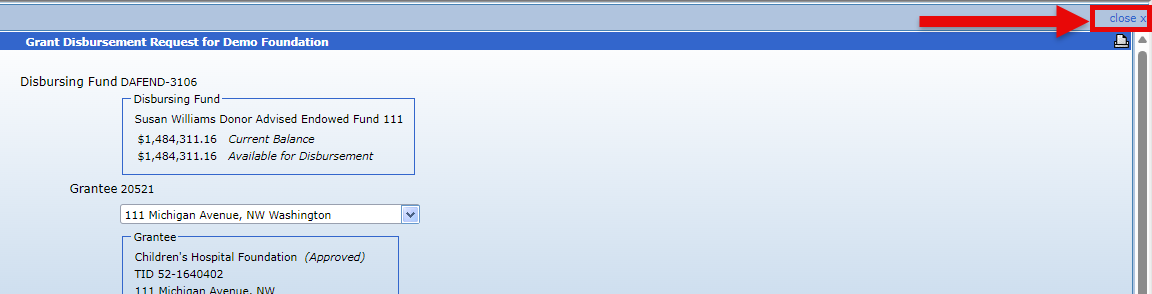
The changes made have been saved in the template.

Any changes made to the Spending Policy Distributions must be saved in order to take effect.
After saving, the Fund will be reverted to ‘Setup’ status and will need to be Approved again through your organizations’ standard approval process.
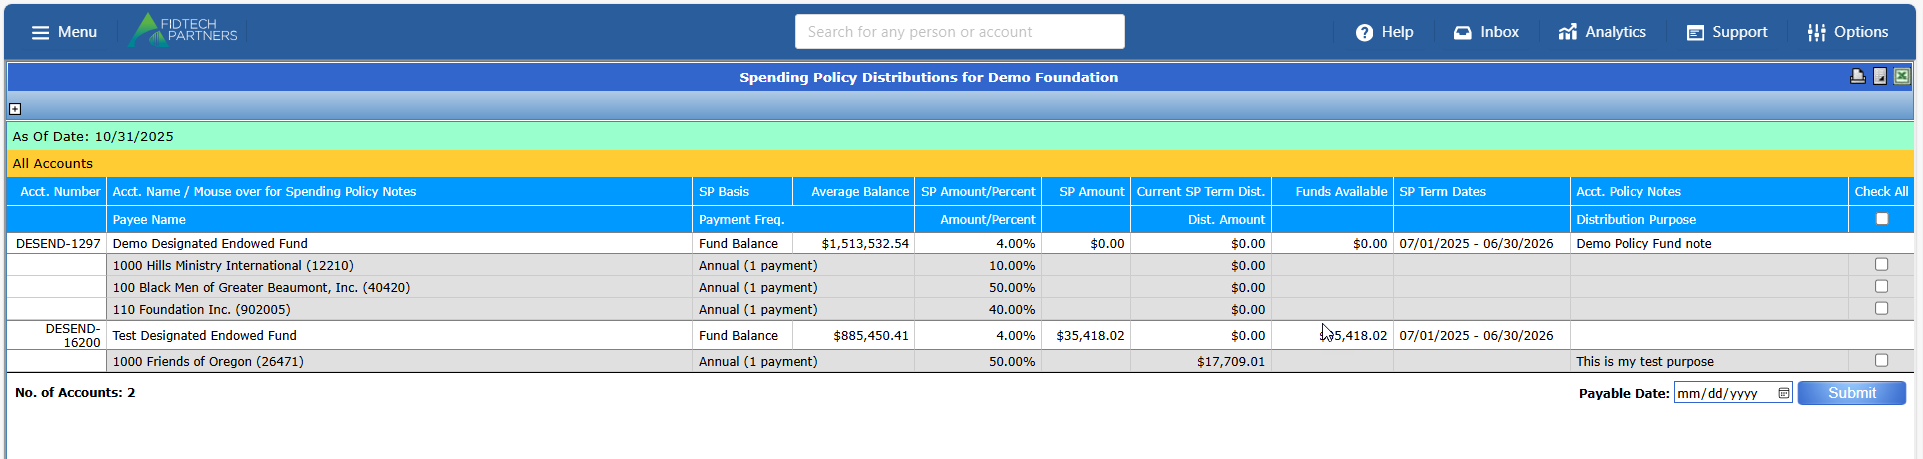
Spending Policy Distributions Report
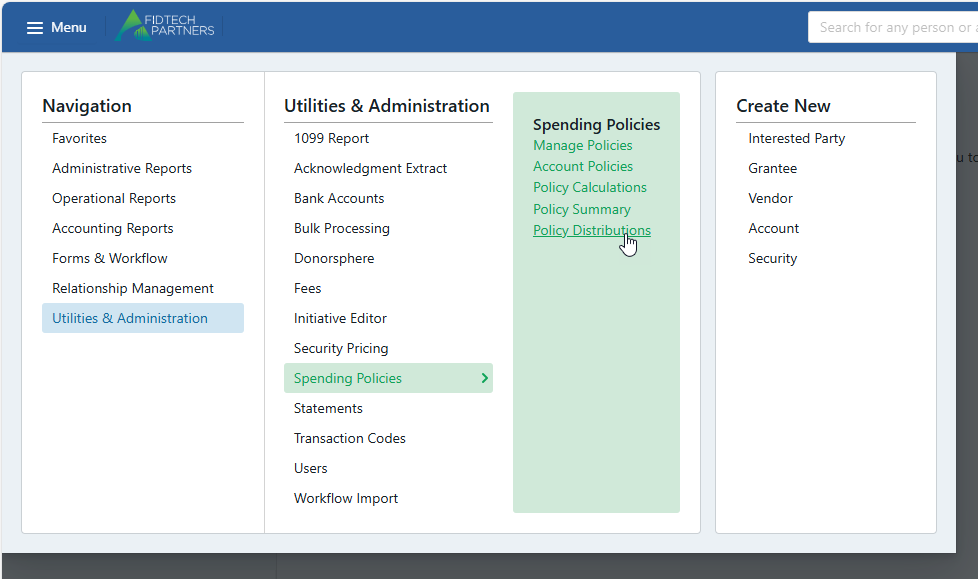
This Spending Policy Distributions functionality includes a report entitled “SP Distributions.” This report is accessible via Menu > Utilities and Admin > Spending Policies > Policy Distributions
This report is similar to the existing “Funds Available” report but now includes filters to search by Entity/Organization(s), Fund Type(s), Audit Type(s), and Fund Sub-Type(s). Additionally, the report can also be filtered by Spending Policies as well.
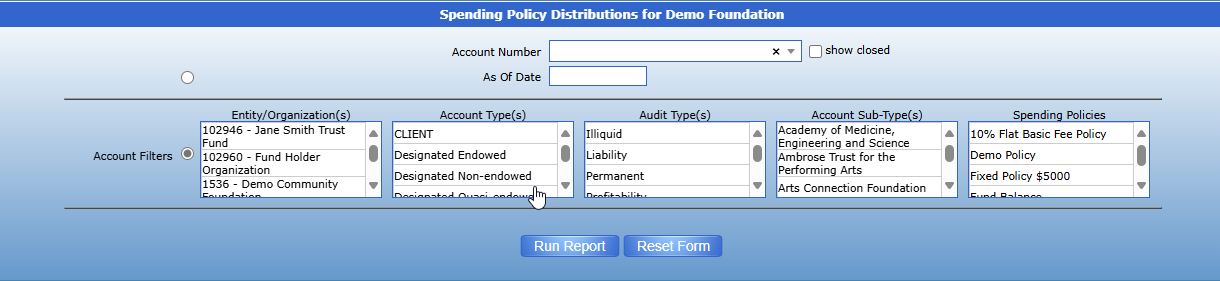
Running the report with no filters will generate a list of all the funds that utilize Spending Policy along with their Average Balance, SP Basis, SP Amount, Current Year Distributions, Funds Available, Latest Fiscal Year End, and Notes. Note that unless the policy is posted via the "Policy Calculations” for the appropriate period, the policy will not appear on the Policy Distributions Report.
If any Funds are utilizing Spending Policy Distributions, the report will generate with a list of funds and their respective Payees:
To generate a workflow for the distribution, check the box as seen in the image below. An option exists to check all and generate multiple workflows at one time. After checking the box, select a payable date for the workflow. Please note, while payments can be future dated, they cannot exceed the final date of the spending policy term. In the image below, the SP Term ends on 06/30/2026. This means that if the date payable is set a date later than that, it will not generate a workflow.
The Payee, Payment Frequency, Amount/Percent and Purpose can only be updated on the Fund Profile level. This report will only allow users to generate the initial workflow. Please note that if a workflow template is not setup for the payee, then the workflow will not generate. In addition, if there are not funds available, then the workflow will not generate.
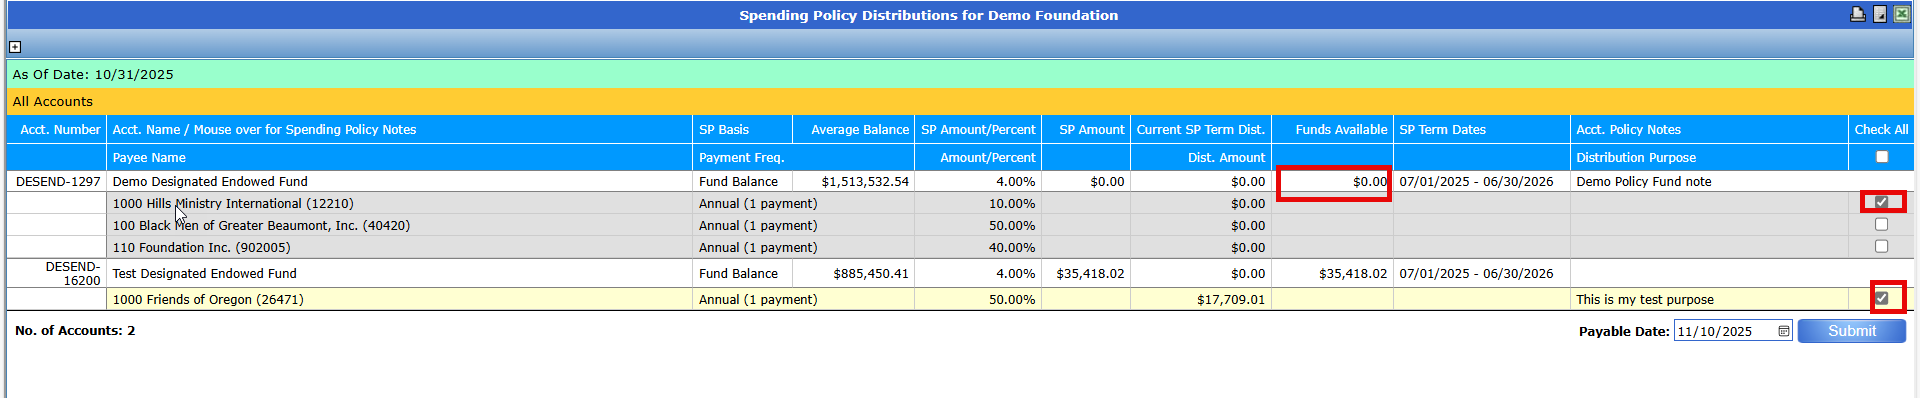
In the example below, a workflow was generated for the fund with an available balance, but not for the fund with no available balance.

Hovering over the workflow will provide some details:

Clicking on the Workflow ID open a pop-up window to the workflow:
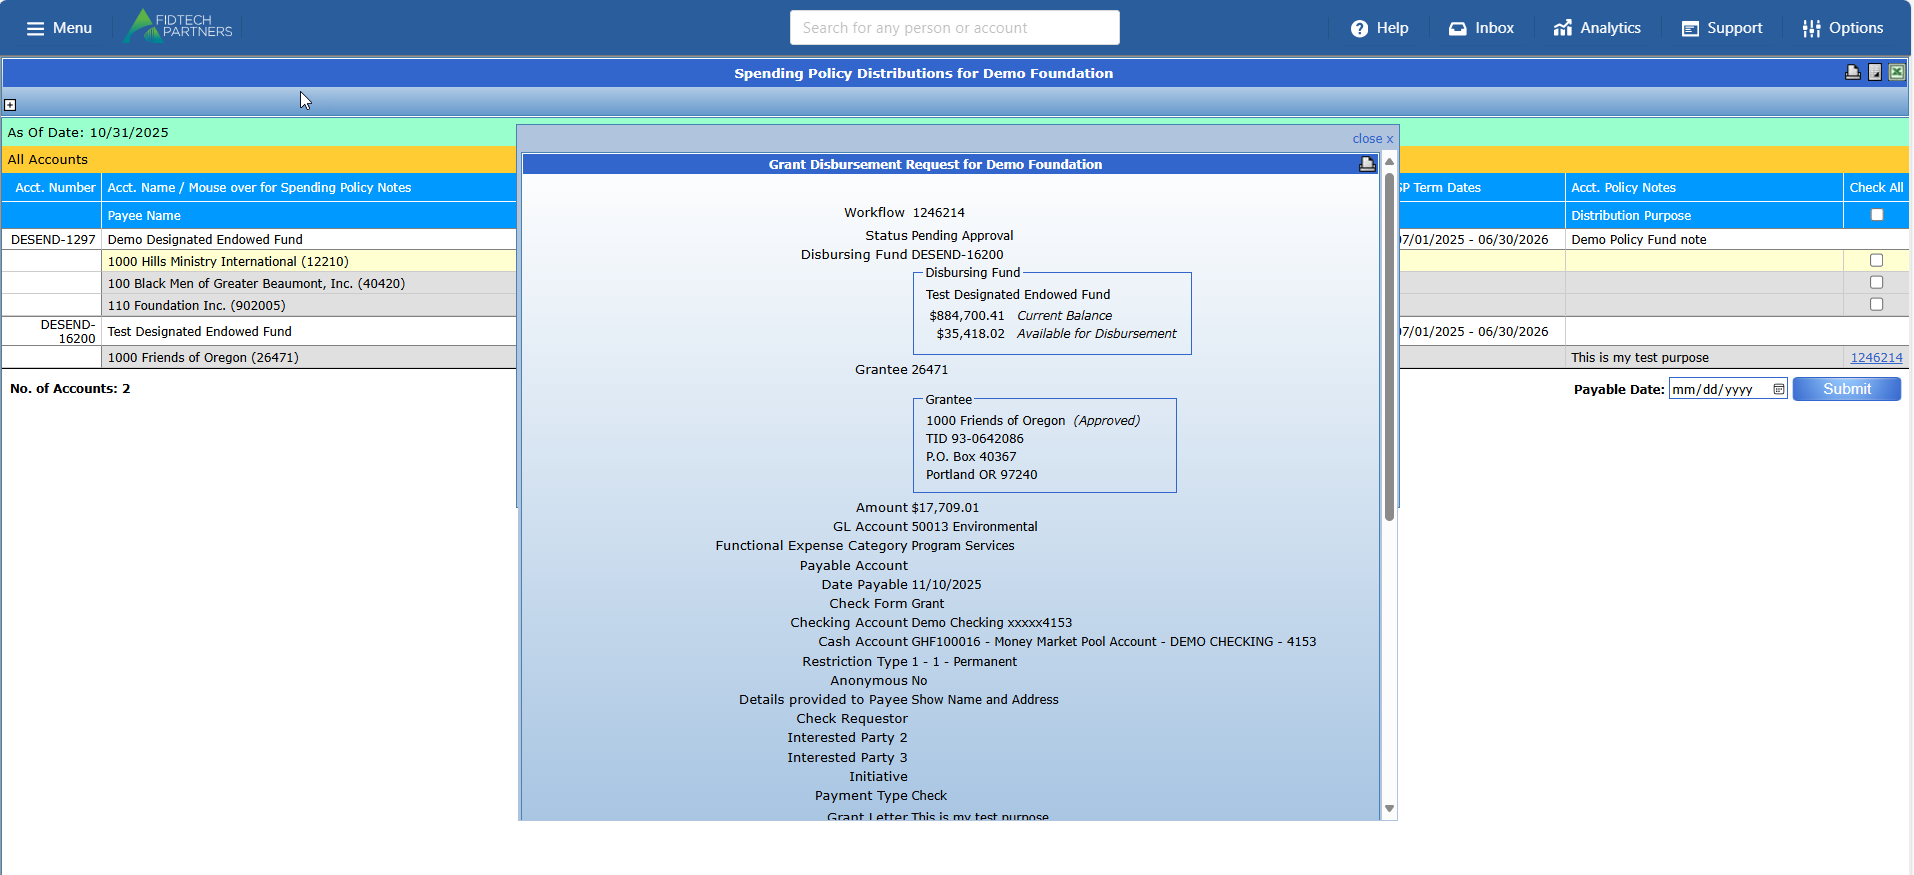
The distribution can now be processed through the standard workflow approval process.
Was this article helpful?