Adding a New Grantee
- 11 Jul 2025
- 6 Minutes to read
- Print
- DarkLight
Adding a New Grantee
- Updated on 11 Jul 2025
- 6 Minutes to read
- Print
- DarkLight
Article summary
Did you find this summary helpful?
Thank you for your feedback!
Assuming you have the correct permissions to set up a new Grantee, there are two ways that you can do so:
Method 1 – Adding a New Grantee from GuideStar
The most straightforward way to create a new Grantee is to use the GuideStar lookup functionality that is built into the FoundationHub.
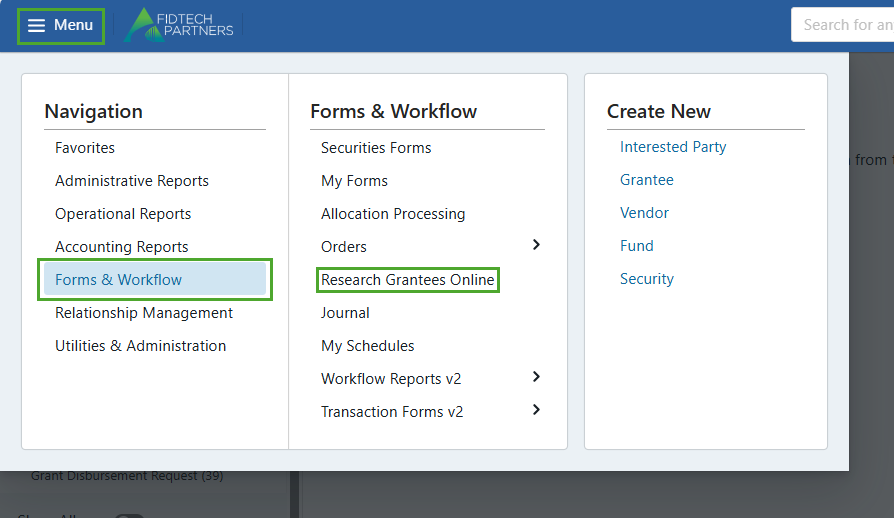
To access this feature, Click on “Menu” > “Forms & Workflows” > “Research Grantees Online”
You will then be presented with a search screen where you can enter keywords from the Grantee’s Name or their EIN (Employee Identification Number) and search for the Grantee online. You can also use the ‘Limit your search by’ options to limit the Grantee search by City, State and Zip Code.
(1).png)
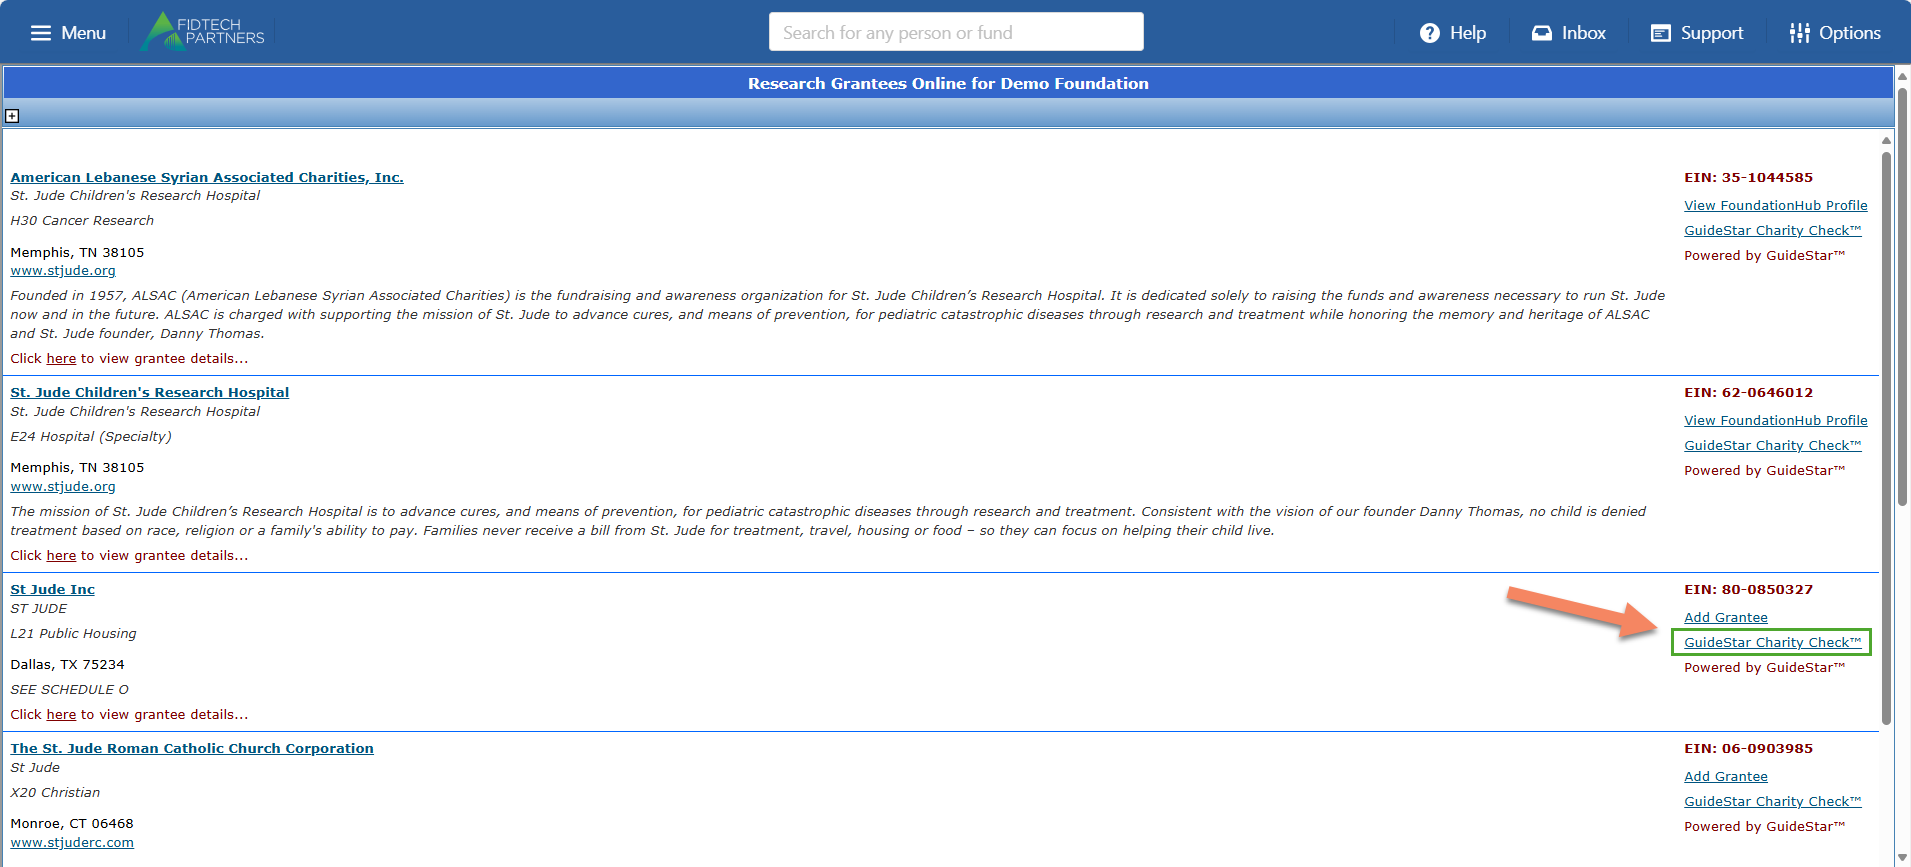
The search result contains all the matching Grantees from GuideStar.
In the results, If the listing has an ‘Add Grantee’ link available, it indicates that the Grantee’s profile does not exist in FoundationHub and can be added to it using the link. If the listing has a ‘View FoundationHub Profile’ link available, it indicates that the Grantee’s profile already exists in FoundationHub and can be viewed using the link.
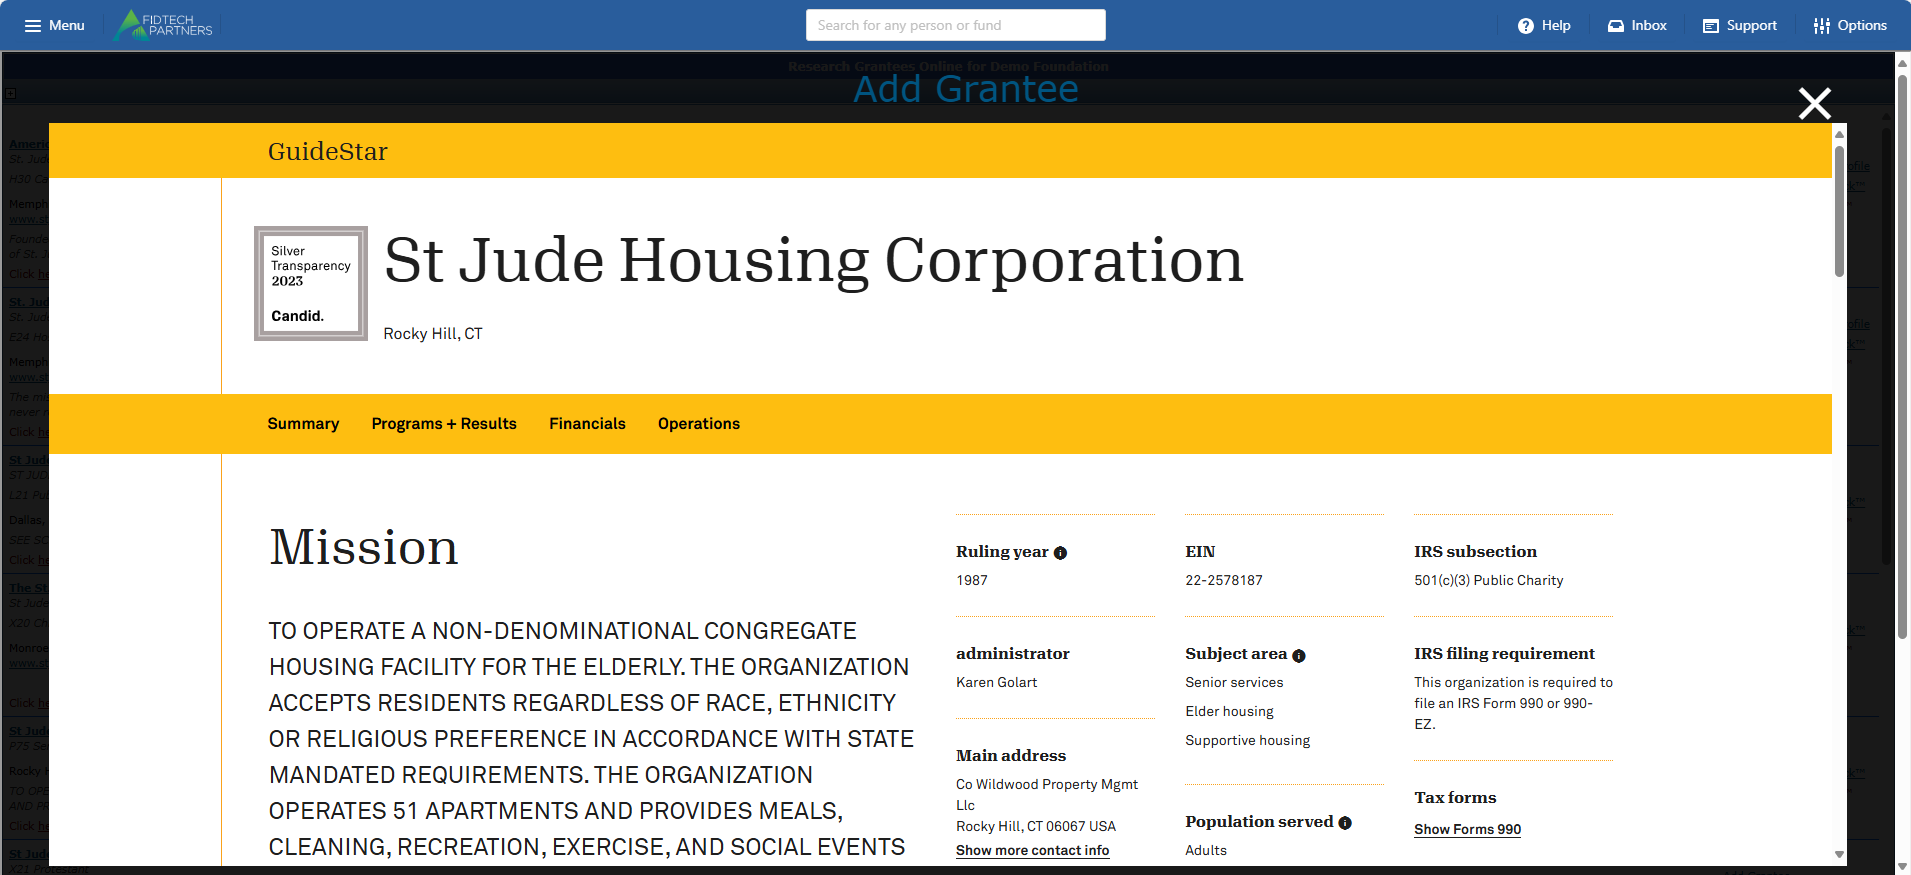
To review the status of the Grantee with the Internal Revenue Service (IRS), click on the Grantee’s Name and this will pop-up the Grantee’s profile from GuideStar. You can review the Grantee’s GuideStar profile on this page.
.png)
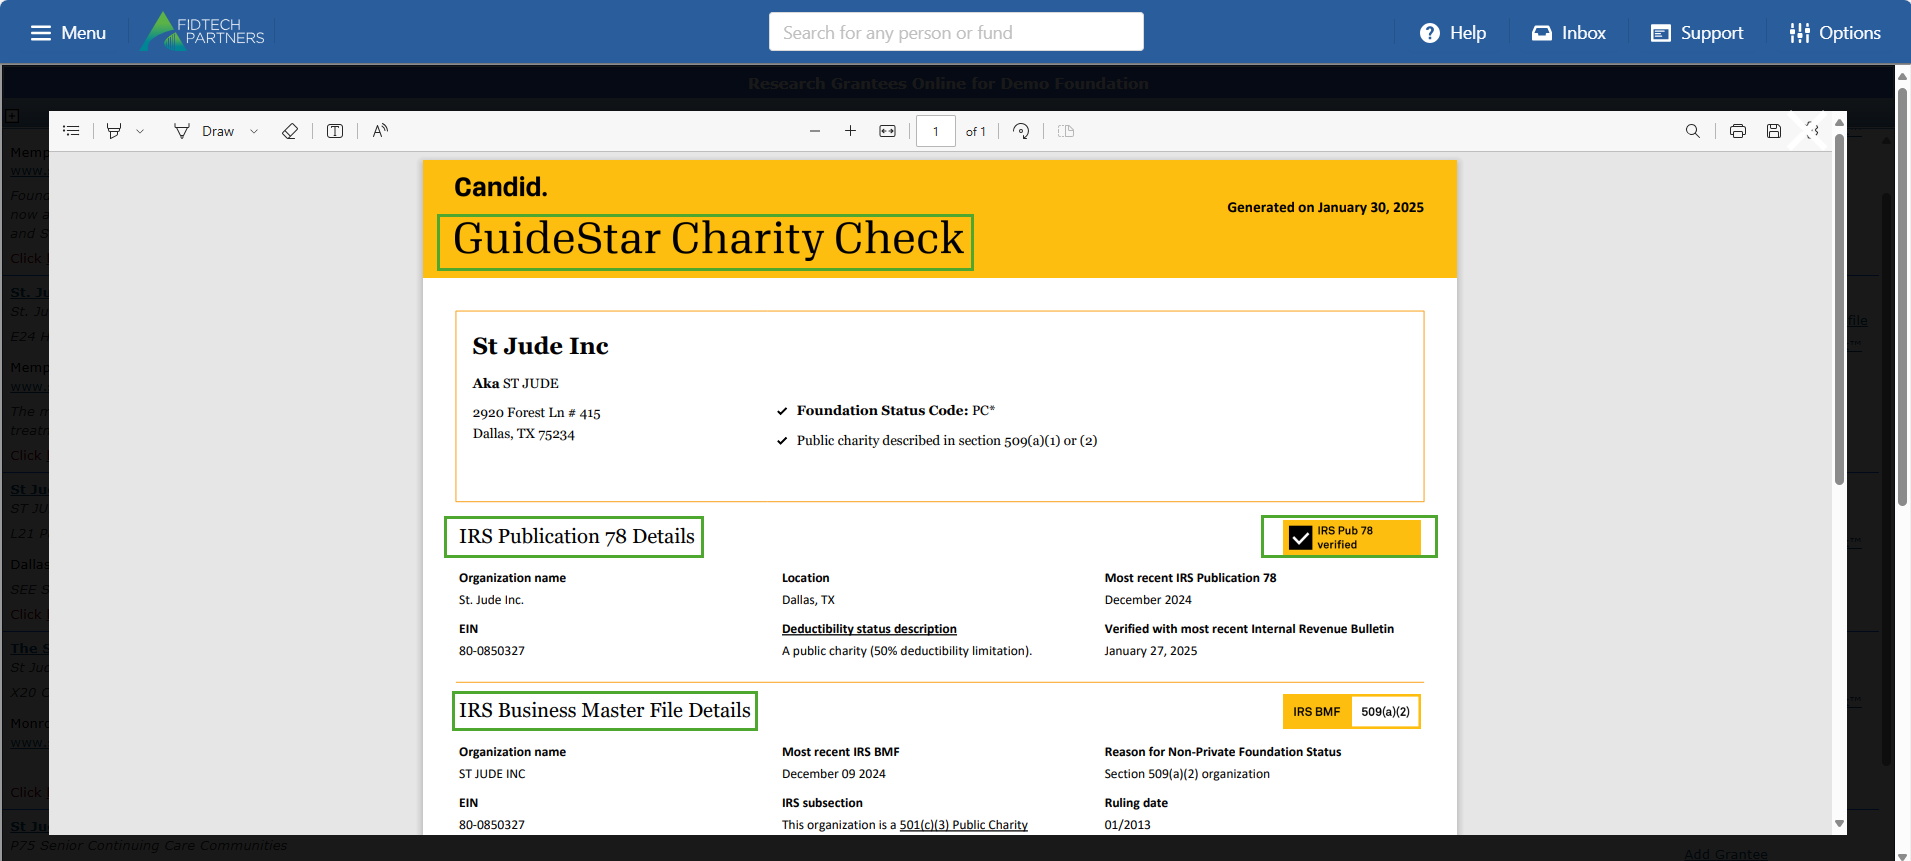
To ensure that the Grantee that you are about to add is eligible through the IRS to receive tax-deductible donations, we need to perform a GuideStar Charity Check of the Grantee before adding them to FoundationHub.
To do this first ensure that you are in the search results page.
On this page, click on the “GuideStar Charity Check” link for the Grantee in the listing.
In the Grantee’s GuideStar Charity Check, if the IRS Publication 78 Details section does not display ‘IRS Pub 78 verified’, or if the organization is not listed on the IRS Business Master File Details section, further investigation is necessary to confirm whether the Grantee meets the required criteria.
After performing the Grantee’s GuideStar Charity Check as mentioned above, close the Charity Check page and click on the listing’s “Add Grantee” link.
.png)
Clicking on this link downloads the Grantee’s record into FoundationHub, and opens a ‘New Grantee’ Form with some information already pulled in from GuideStar.
.png)
In this Form, you can enter the Grantee’s details as below:
Entering Contact Info:
External ID field is used to enter a unique identifier assigned to the contact, by an external system or a third party.
You can also enter the following details: Category, Organization Name, Doing Business As, Short Name, Email, Phone Type and Phone
Entering Address Info:
Address Type lets you choose the appropriate type of address.
Note: Address for Grantees created using GuideStar can’t be edited after initial setup. This makes any changes made to the address during setup permanent.
Address 1 field is used to enter the main address of the contact, whereas the additional Address 2, 3, and 4 fields allow you to enter any text that does not fit in the Address 1 field. City, State, Zip and Country fields are required.
Finalizing the process: After completing all the required fields, proceed as follows:
“Save and Open Contact”: This option saves the Grantee's information and opens their contact profile.
“Save and Close”: This option saves the Grantee’s information and closes the Form.
Note: In both cases, the newly created Grantee may or may not go through an approval process, depending on your institution's setup policies.
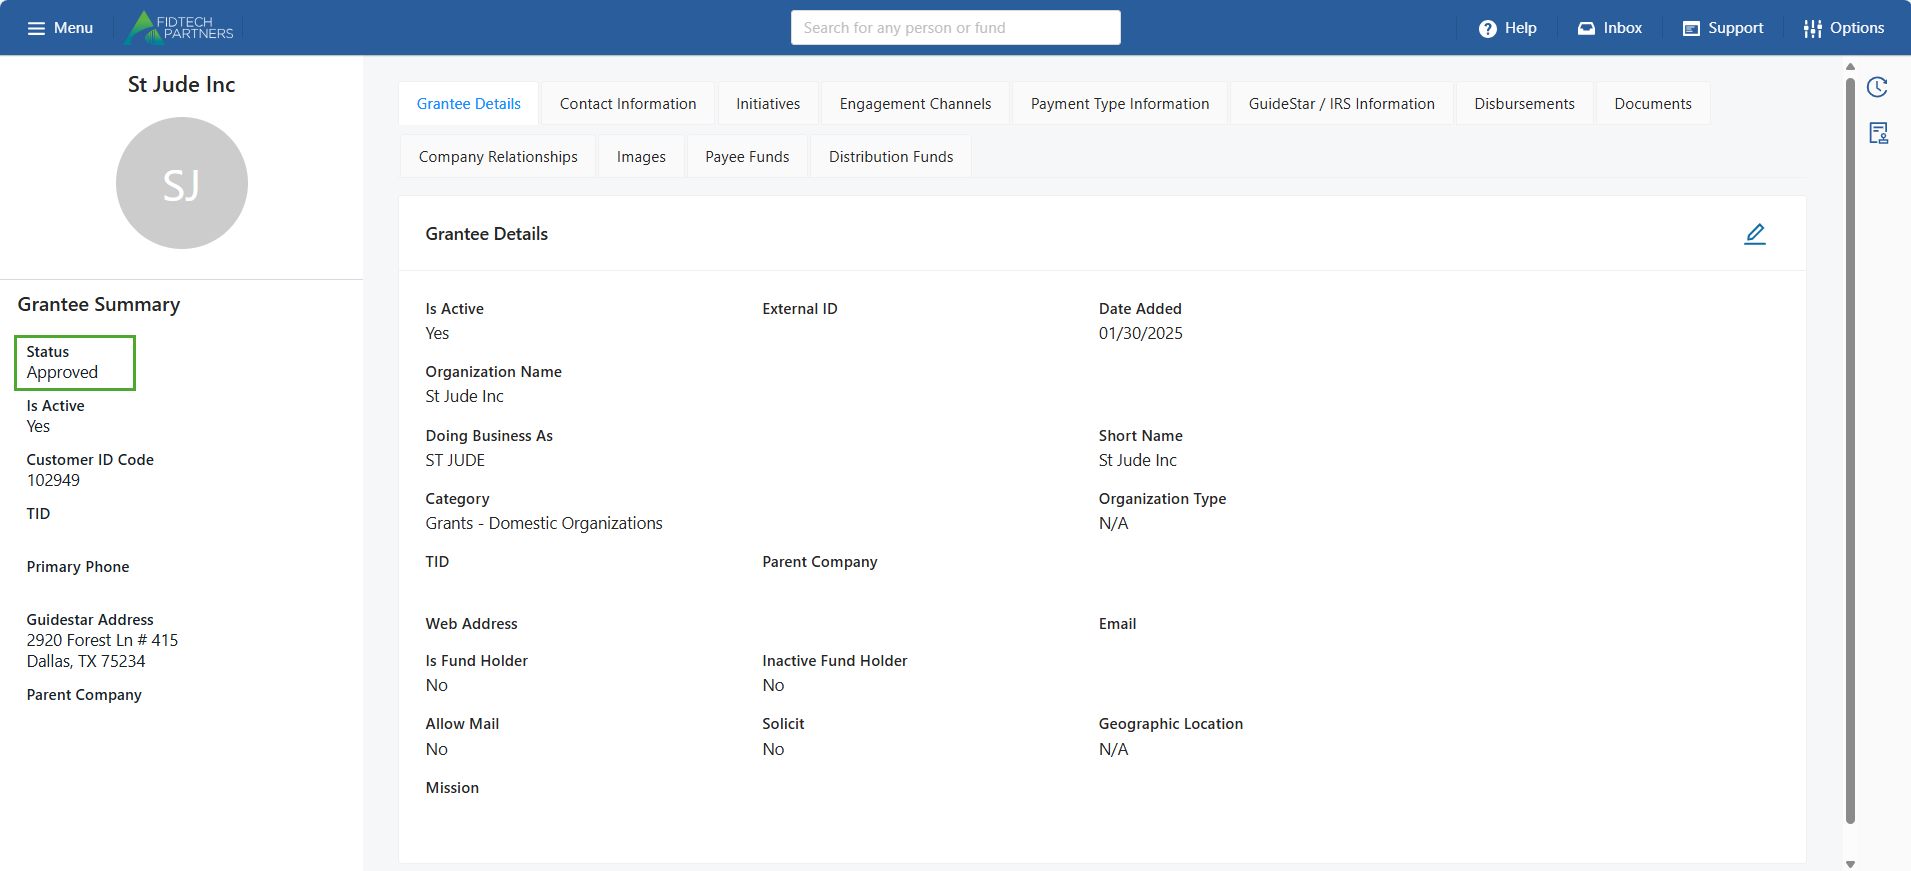
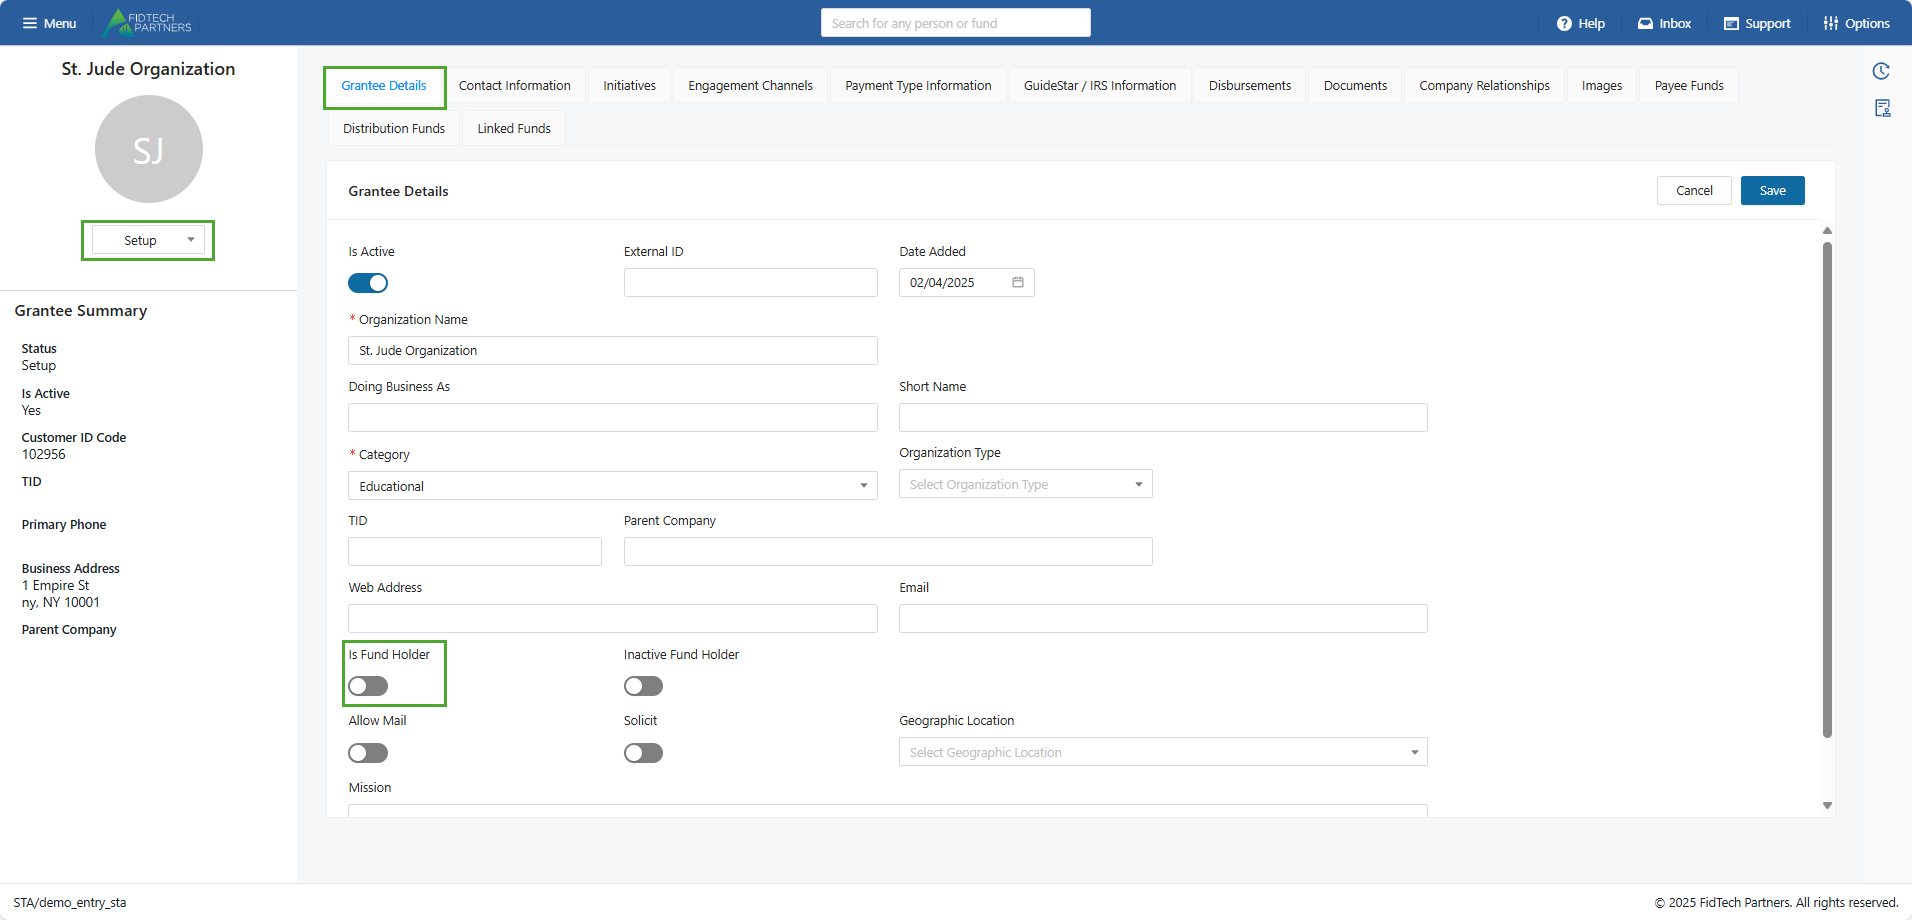
A newly created Grantee’s profile is initially in ‘Setup’ status. You can see this on the left side of the contact’s profile. The Entry-Level User who added the Grantee into FoundationHub needs to change this status to ‘Approve’. This forwards the Grantee’s record to the Approver-Level User’s Inbox.
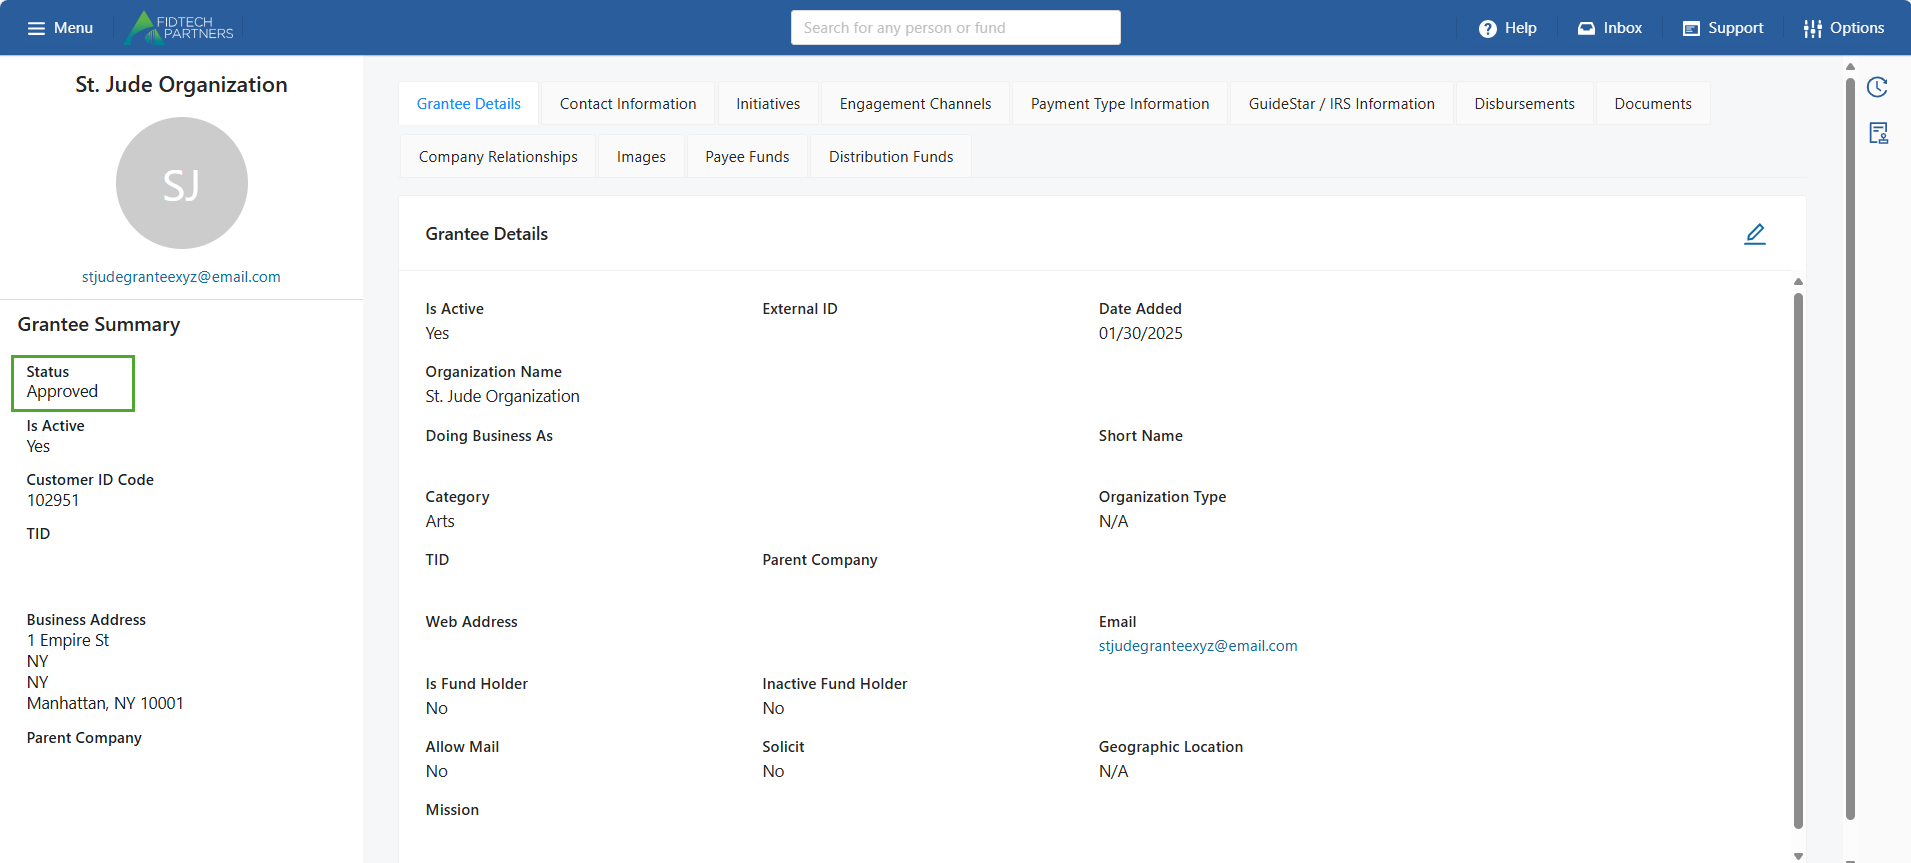
The Approver-Level User should carefully review each section of the new Grantee’s record. After reviewing, the user then needs to activate the record by changing the status of the record to ‘Approve’.
Note: These approval levels may vary based on your institution.

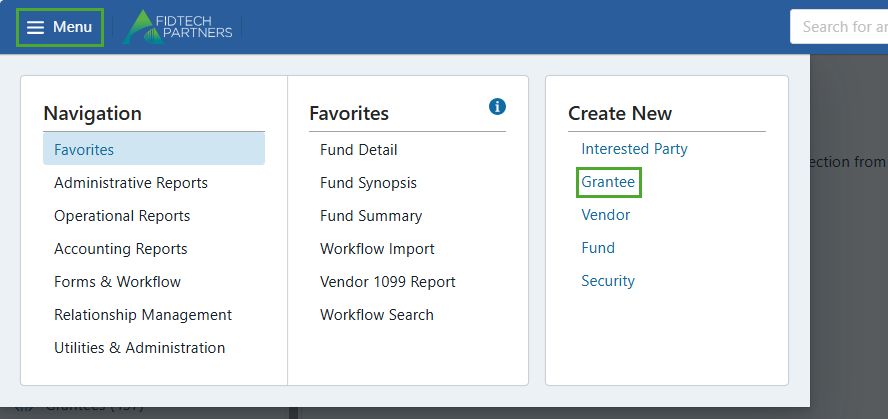
Method 2 – Add a Grantee Manually
For various reasons, some Grantees may not have a GuideStar record. Such Grantees need to be manually entered into FoundationHub.
Assuming you have the correct permissions to set up a new Grantee, on the top-left corner, click on Menu > Grantee
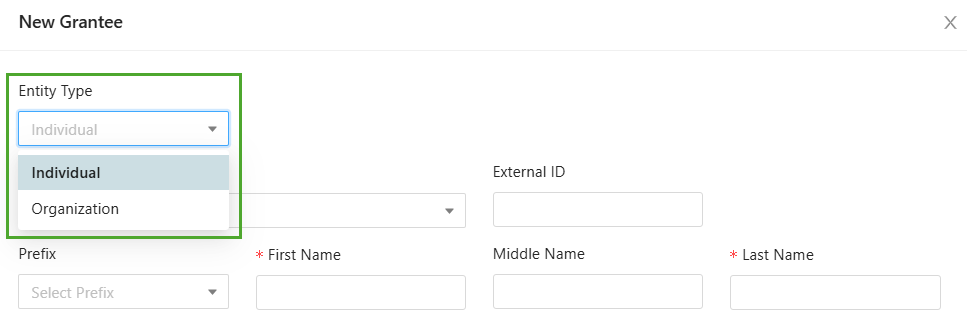
A blank ‘New Grantee’ Form pops up in which the fields marked with an asterisk (*) are mandatory for the new Grantee creation.
Note: These fields may vary based on your institution.
.png)
In this Form's Entity Type dropdown, selecting Individual or Organization shows different fields to enter based on your choice.
Fields for Grantee: Individual
Entering Contact Info:
External ID field is used to enter a unique identifier assigned to the contact, by an external system or a third party.
For an Entity Type: Individual, you can enter the following details: Category, Prefix, First Name, Middle Name, Last Name, Suffix, Doing Business As, Email, Phone Type and Phone.
.png)
Entering Salutation:
Salutation 1 Type and Salutation fields are used to enter the salutation details of the contact that will appear in greetings, letters, statements etc.
E.g. Salutation 1 Type: Formal Individual could have Salutation 1: “Mr. John Doe”
.png)
Entering Address Info:
Address Type lets you choose the appropriate type of address.
Address 1 field is used to enter the main address of the contact, whereas the additional Address 2, 3, and 4 fields allow you to enter any text that does not fit in the Address 1 field. City, State, Zip and Country fields are required.
.png)
Finalizing the process: After completing all the required fields, proceed as follows:
“Save and Open Contact”: This option saves the Grantee's information and opens their contact profile.
“Save and Close”: This option saves the Grantee’s information and closes the Form.
Note: In both cases, the newly created Grantee may or may not go through an approval process, depending on your institution's setup policies.
.png)
A newly created Grantee’s profile is initially in ‘Setup’ status. You can see this on the left side of the contact’s profile. The Entry-Level User who added the Grantee into FoundationHub needs to change this status to ‘Approve’. This forwards the Grantee’s record to the Approver-Level User’s Inbox.
The Approver-Level User should carefully review each section of the new Grantee’s record. After reviewing, the user then needs to activate the record by changing the status of the record to ‘Approve’.
Note: These approval levels may vary based on your institution.


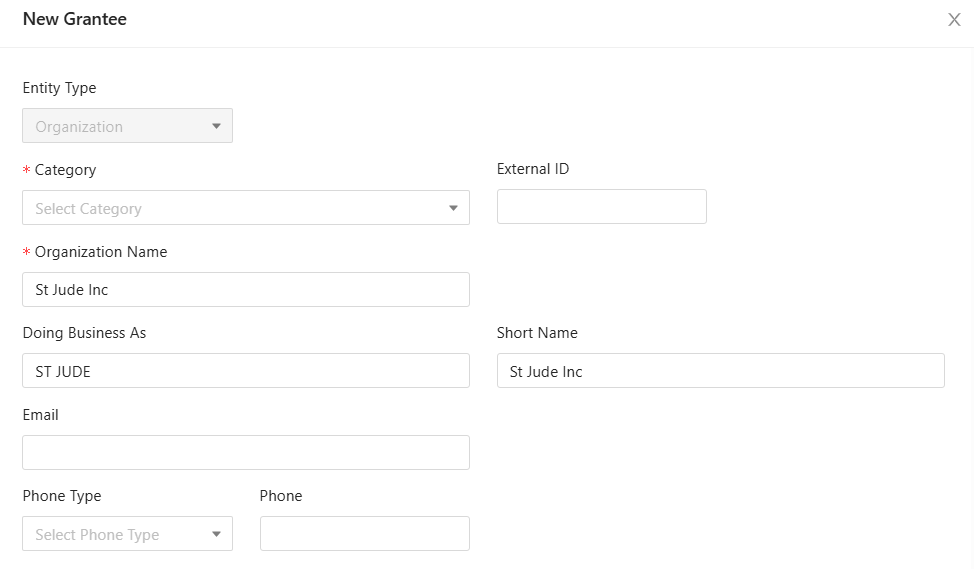
Fields for Grantee: Organization
Entering Contact Info:
External ID field is used to enter a unique identifier assigned to the contact, by an external system or a third party.
For an Entity Type: Organization, you can enter the following details: Category, Organization Name, Doing Business As, Short Name, Email, Phone Type and Phone.
.png)
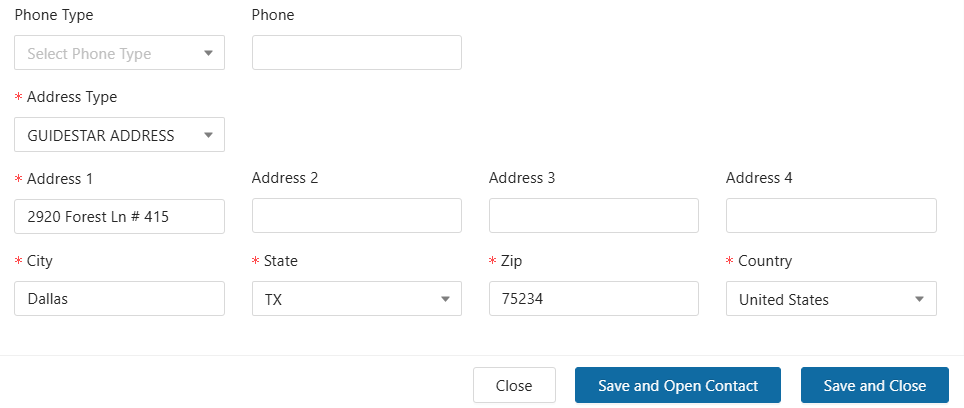
Entering Address Info:
Address Type lets you choose the appropriate type of address.
Address 1 field is used to enter the main address of the contact, whereas the additional Address 2, 3, and 4 fields allow you to enter any text that does not fit in the Address 1 field. City, State, Zip and Country fields are required.
.png)
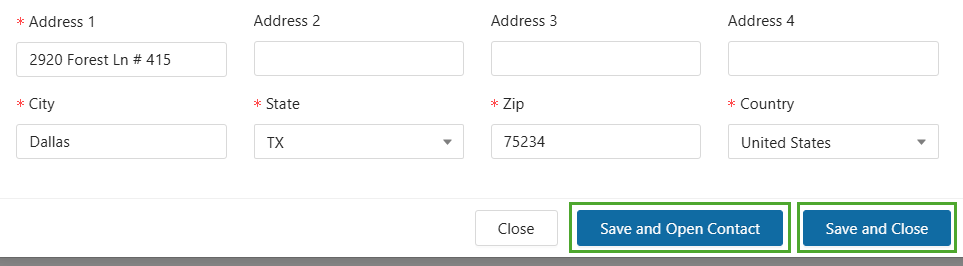
Finalizing the process: After completing all the required fields, proceed as follows:
“Save and Open Contact”: This option saves the Grantee's information and opens their contact profile.
“Save and Close”: This option saves the Grantee’s information and closes the Form.
Note: In both cases, the newly created Grantee may or may not go through an approval process, depending on your institution's setup policies.
.png)
Note: Grantees can also be assigned as a Fund Holder Account. This needs to be done while the Grantee is in its initial Setup status and cannot be done afterwards. Click on this article to learn more.
A newly created Grantee’s profile is initially in ‘Setup’ status. You can see this on the left side of the contact’s profile. The Entry-Level User who added the Grantee into FoundationHub needs to change this status to ‘Approve’. This forwards the Grantee’s record to the Approver-Level User’s Inbox.
The Approver-Level User should carefully review each section of the new Grantee’s record. After reviewing, the user then needs to activate the record by changing the status of the record to ‘Approve’.
Note: These approval levels may vary based on your institution.

Was this article helpful?